Friday, December 30, 2016

Birthday card with embossed foil

I created this card for my brother who has a birthday in early January.  I started by gluing foil to a 4.25" x 5.5" piece of heavy cardstock using a glue stick and folding the edges to the back and gluing those down as well.  I embossed it with a gears embossing folder and then applied several layers of ink, paint and permanent marker.  I wiped off the excess in between the colours/mediums and also sanded the high spots a couple of times.  I found this ART stamped image in my stash and embellished it with several layers of watercolour and stamping before I embossed it with the same embossing folder and then ran a brown stamp pad over it to highlight the embossing.  It was too bright so I toned it down with another layer of brown colour wash which resulted in more the look I was going for.  I glued it to my embossed foil layer using double sided tape.  I trimmed and watercoloured the coffee cup image and layered it onto black.  I cut two flags to layer onto the back - one from wood decorative paper and one from the same cardstock I used for the card.  They also seemed too bright so I toned them down by stamping them with a background stamp and some brown ink.  I applied this focal element to the right hand side of the card and added my layered greeting to the left hand side which allowed the large wheel in the embossing to show.  Very happy with how it turned out and will be sending it on it way today!

Therese

Twig wreath

I have finally finished my twig wreath!!!  I started more than a year ago when I designed the wreath and had DH create the substrate - a donut cut from thin wood.  I collected the willow twigs after the trimming of the willows in the early spring and cut them all to size - small, medium and large. They had been sitting in the back garage drying for more than a year so this summer I took the time to glue them all to the substrate with hot glue.  I was very happy with how that went and trimmed all the hot glue strings in preparation for painting.  I had wanted to paint it light gray but others liked the very earthy colour of it in its natural state so it sat yet for a another while.  About a month ago I decided that I would paint it light gray as I had originally planned so went looking for paint.  I had thought mat finish but could not find anything besides primer that was matt finish and it was too dark a gray for what I wanted.  So bought light gray enamel paint in a spray can with the plan to spray it with clear matt finish.  I sprayed the wreath 4 times over the course of one day - one coat on the back and three on the front.  I used a produce crate to support it while drying which worked really well.  I am very happy with how it turned out as it still has lots of texture and depth which may have disappeared if I had continued to add layers of paint.  While I was out buying paint I found this burlap poinsettia discounted in the Christmas aisle of Peavy Mart.  I bought one red - all they had - and one beige.  I dismantled the beige one and applied a colour wash of green acrylic paint to the largest petals and then dismantled the red one, removed the spacer and added the green one to the back!!!  Perfect!!  I wired them together and then added them to the wreath with the wire once I had positioned the flower where I wanted it.  It was ready in time to put up for Christmas!!  I have felted wool roses in three sizes (Thanks, Suzanne) which I will do up to add to the wreath for the rest of the year.  It looks exactly as I had hoped it would!!!

Therese

Sunday, December 25, 2016

Handmade ornament for a gift exchange

I made this little quilted tree ornament for a gift exchange at our family Christmas on Christmas Day.  I found the top layer of the tree in my stash which I created at the same time as this one.  I finshed this one a little differently.  I added some batting which I machine stitched in place following the lines in the quilting.  I cut the same sized tree out of green felted wool and stitched it all the way around with green thread on the front and red thread in the bobbin.  I added a red rick rack garland and secured it with a few stitches where it touched the edges.  With the layers secured I used red floss to blanket stitch all the way around being sure to secure the garland on all the edges.  I found this white beaded trim in the bag with the tree so I decided to use it to trim the tree edges.  I simply stitched in into place along the edge using overhand stitches and white thread.  It softened the red outline which the blanket stitching had created which worked out better than I expected.  I stitched on some sequins - red, green and gold  - adding seed beads to keep them secure.  I stitched several beads in place on the garland to keep it in its place and add yet more sparkle.  I stitched on a rick rack hanger and added the layered sequin star which is secured by a little yellow crystal bead.  I added a drop of glue where the pearl beaded trim joined up to keep both ends aligned.  I added a tag on the back with my name and the year.  This ornament will be combined with a consumable gift which all has to fit in a shoe box and be wrapped in newsprint.  Looking forward to a great Christmas with my family!
Therese

Thursday, December 22, 2016

Versatile sketch that features layers and a die cut

I made a few card kits for my last class that featured all occasion greetings and subject matter for anyone who might be interested in not making Christmas cards.  It was fun to use this very versatile sketch to make cards for any occasion.  Here you can see that I made ones for a birthday and anniversary.  It is just a matter of substituting appropriate elements - hearts and a leaf die cut instead of the little tree and changing the greeting.  I love versatile sketches!!!

Therese

Tuesday, December 20, 2016

Greeting cards with photos from a calendar

 My friend gave me this calendar to see if I could make greeting cards with the photos.  She had seen this post on my blog where I had used photos from my sister's calendars to make cards and thought maybe the same could be done with the ones on this one.  The photos are awesome and I really preferred to not cut them if possible. After a conversation with my sister I realized that if I chose to make larger cards it would be possible to not cut the photos.  I went looking in my stash for envelopes that would be suitable.  I was very happy to find a little stack that would do perfectly.  I laid out the words for the front and the credits for the back in Corel Draw and printed them on letter sized white cardstock.
After that it was simply a matter of trimming the cards to size, folding them in half and I was done!!
So a little stack of beautiful birthday cards for my friend which I am sure she will appreciate!!
Therese


Monday, December 19, 2016

Fabric postcard with a cardinal


I created this fabric postcard for my birthday exchange on one of my groups!!  My partner's birthday is on Christmas and I thought that a cardinal would be appropriate so I went looking on line for examples of how others have featured cardinals on quilting projects.  I found a few ideas and a few patterns.  The one I found could not be printed large enough so I just hand drew the shapes by hand on scrap paper.  It was too big for the postcard so I redrew it with better guidelines which worked much better.  I found this great red fabric (4"square) in my scraps and traced my drawing onto it placing the wing above the back as a separate piece. I used fusible web to back both pieces and the worked on the small pieces for the beak and the face.  I backed them with fusible web as well and ironed them onto the bird.  I added fusible webbing to the wing too. Next, I needed a background and from my scraps I chose this beautiful snowflake fabric.  It was long instead of wide so I cut it in half and sewed the two piece to each other and trimmed it to 4" x 6".  I added batting and stitched all sorts of wavy lines all over it.  Next, I positioned the cardinal and ironed him into place and then did the same with the wing.  I added a line to the beak with a fine tip permanent marker and fused the wing into place as well.  That was looking like a cardinal!!  It needed a bit more definition so I stitched all the way around the bird and wing in red.  It does not show up as much as I had hoped.  I created a backer and stitched it to the back of my postcard starting with a trip all the way around the border and then an all over design around the bird.  Afterwards, I remembered that I had meant to add a tree branch of some kind and a black bead for the eye.  It was easier than I thought it would be to stitch in the branch with green floss and sew on the black bead for an eye.  It does not show up as much as it appears in real life.  I added narrow fusible webbing to the back of some green fabric and cut out strips to create my binding.  Once it was fused on the postcard all the way around I stitched it with ivory thread.  On hind sight, green might have been a better colour but that is the way it goes!!  I will be sending it off in time for it to arrive for her special day!!
Therese

Cards with embossed accent with ribbon


Here are a few cards I made up with all occasion greetings instead of Christmas for my class at the end of November. 
I love versatile sketches!!  
The little embossing folders are by Sizzix!

Therese

Saturday, December 10, 2016

Thinking of you with a little tulip

 I am making cards for my stash.  I have started selling cards as a fundraiser and am always adding to my stash to stay ahead of sales.
I started with a purple card and added a white embossed background (D'Vine Swirl CB) to which I had tied some rainbow fiber which coordinated with my watercoloured tulip image (Melonheadz).  I layered the coloured image with pink and green cardstock that coordinated and border punched the right hand side.  I added it to my card front along with my layered laser printed punchie greeting using 3D foam tape.                Therese

Friday, December 09, 2016

Old car for a vintage feeling birthday card & butterflies for a sympathy card

I created a few more card kits for my next class which follows the sketch from this previous class but are all occasion instead of Christmas.  The Christmas ones are here.  I found a lot of great photos on Pixabay.  I laser printed the image in colour just I did for the Christmas ones, trimmed them out, added ribbon and a layered greeting to finish them off.
I love this old car and it made a wonderful masculine card!!

For this sympathy card I printed a collage that featured butterflies with a nice soft look!!  This is also on Pixabay and is by Artsy Bee.  There are a lot of great images in that porfolio.

Therese

Thursday, December 08, 2016

Baby or Wedding card in light blue and white

I love these lacy hearts I received as a RAK in one of my exchange cards!! I used another on here. I layered a very soft and subtle blue decorative paper over a white card front and added wrapped it several times with some shimmery white fiber and tied it off in a double knot.  I added blue flower punchies and sequins to several of the flowers in the die cut to coordinate with the decorative paper and to add some subtle texture to my card.  I attached them to the die cut using tiny white brads.  I used glue dots behind the brads to attach my focal element to my card front.  Below I added a layered punchie greeting which finished off my card perfectly.  What's the best is that this card is perfect for a wedding or a new baby boy!!

Therese

Wednesday, December 07, 2016

Basic black & white with one colour

I found this background in my stash and I do not recall from where it originates!!  That does not usually happen but there goes.  It is possible that it arrived in a RAK package.  I glued it to a white card and added a border with a red marker.  I watercoloured the flower on the greeting (Beccy) in red so I added a red layer behind it  and border punched it to give it a bit of detail and texture.  I made it long enough to go all the way across the card and glued it over the background.
Really happy with how this one worked out!  Could have been any colour and it would have worked just as well!!

Therese

Tuesday, December 06, 2016

Layered flower with a punchie greeting

I am still making cards for my stash.  For this one I found this flower accent in my stash.  The orange flower had been glued off center so I had been putting off using it.  Yesterday, I decided to try to remove it and fortunately it worked quite well.  I was able to remove it without too much damage and replaced in better position without an visible evidence.  I added a little white button brad to hold everything together.  Love it when it works out!  So, I went looking for a background and found this one in my stash which was given to me by a friend a while back.  It worked perfectly so I trimmed it and glued it to a light green card front.  I added a laser printed layered punchie greeting just below the flower which nicely fills in the center portion of the embossed background.  I did tweak the petals a bit after I put it all together which gives them just a bit more dimension!!

Therese

Scrappy quilted heart ornaments

 I quilted up some heart ornaments for Christmas giving!!  I started with strips of mostly red printed fabric scraps and added a strip of white and a couple of patterned ones that include green and other colours just to give a good mix to the final product.  I made two pieces and stitched them together end to end.  I added a piece of batting and a backer in green patterned fabric with bears and Christmas lights.  I pinned them together and stitched along the length with red thread on the top and green thread in the bobbin. I made my own pattern using folded paper and pinned it to my fabric diagonally to make the best use of the piece and trimmed them out.  I got eight hearts!  I used red floss to blanket stitch the edges to finish them off nicely and used the end of the floss to create a hanger.  Handstitching is great for doing in the card on a trip so I finished them up on the weekend when we went to visit Dad for his birthday.  I laser printed buttons (Sweetly Scrapped) on cardstock, punched them out and sponged their edges and the two central holes.  I stitched them to my ornaments using red floss as well.

Loving the look of them and they are a wonderful scrappy project.  Triangular trees would make very efficient of a strip of green quilted fabric which I may try out next time.  Nice to have a few little gifts in your stash for last minute hostess gifts or for including in a card to a friend, etc.  

Therese

Monday, December 05, 2016

Wedding or Golden Anniversary card

Always want to have a few wedding or anniversary cards in your stash so I made another one today.
I started with an ivory card and added this beautiful gold paper to it.  I found a lace that worked perfectly with the stripes in the paper and added just the right amount of texture.  I added it to the paper before adhering it to the card.  I added two heart punchies (SU) - one stamped and punched, the other punched from another beautiful gold paper which I embossed to give it some texture.  I layered my little laser printed greeting punchie onto a yellow label punchie (SU) which was just the right colour and finished off my card very nicely which I added with 3D foam tape.
This one would be suitable for a golden anniversary as well as a wedding.  Nice to have it be versatile as well as beautiful!

Therese

Burned wood for my birthday card

My Dad is a retired carpenter and I like to add wood to his birthday cards.  I am fortunate that my DH also does some wood working so little pieces of wood show up from his shop regularly.
I retrieved this one from my little stash of wood pieces and decided to do some wood burning on it because I have been wanting to try that for quite a while.  Never having done it before and very little time I decided having a image to trace would be best so I dug through my stamps looking for something appropriate as well as simple in design.  This little maple leaf was just what I needed.  I stamped on my thin piece of wood with my greeting, then in an all over design with the leaf and then plugged in my wood burning iron. Once it was hot, I started going over the leaves one at a time tracing all the stamped lines.  The grain of the wood affects how dark the burn is and how deep the tip goes so it was a bit of a learning process.  After doing all the leaves and greeting it still needed a bit of something so I added stippling with the iron.  Just what it needed!  I reinforced several areas of my wood with tape before I glued it to a brown layer and cut the edges of the cardstock with decorative scissors.  I added strips of gold cardstock on both side of my element and glued it to a dark maroon card which I had border punched on the front edge.  I added dots in the scallops and lines on either side of my focal element with a gold gel pen.  That was looking pretty good but it still needed a bit of something so I decided to add water colour.  I started with one leaf thinking I was going to do them all and decided that one would be best.
Loving my first wood burning project!!  I have a few other ideas so maybe that will show up here in the future some time!

Therese

Sunday, December 04, 2016

Cute butterfly for a kid's card

For this stash card I went for a different look for a kids card using brown, blue and yellow. I started with a brown card front and added an embossed (SU) dots layer which I watercoloured to coordinate with the greeting and sponged the edges a bit too.  I stamped it all over with a bit of blue using my stipple stamp (SU) to keep the theme going.  I watercoloured the little butterfly (meljens) with shimmery paints and layered it onto blue and then glued this element to my card front.  I layered my little laser printed greeting to a little brown label die cut which I found in my stash.  Changes it up a bit which I most appreciated.  Therese

Simple Sentiments - quick and easy cards with images from a photo calendar


I was needing a gift for an exchange and thought I would work with calendar images from my sister's calendars.  She produces several every year - this year she created a nature, black and white cityscape, owl and tea one! They have wonderful photographs and it seems a shame not to reuse them.  I used photos from the past two years from a Nature and Alberta Road Trip calendars that I received for Christmas.  You can check out her Simple Sentiments cards sets with a similar format.  She also has several sets listed here.  
I started by downloading frames - the scrolly one is from Clipartkid and the oval one is from Graphics Fairy - which I positioned at the bottom four quarter pages in my layout program, added the greetings with a nice font and printed on white cardstock.  I laser printed the letter sized pages and trimmed them apart to be 4" x 5.25".  I trimmed the images from the 4" x 6" calendar pages to fit above the greetings leaving an even margin.  I glued the images to the greeting layer and then added a bit of watercolour to the greeting to coordinate with the image and then glued this larger focal element to the front of a coordinating card.  Quick and easy greeting cards and a environmentally friendly reuse project!!   I am off to get them packaged for the party!

Therese


Saturday, December 03, 2016

Sympathy card with a butterfly

Another addition to my stash! For this sympathy card I started with a turquoise card front, added a white embossed scroll frame to which I added a turquoise oval (Nestie) and a fussy cut stamped butterfly.  I stamped the greeting on the oval using white pigment ink and embossed it with white embossing powder.  It took three tries to get it right but I am happy with how it turned out.

Therese

Friday, December 02, 2016

Baby cards

 A few baby cards for my stash!!  I started my first card with a lavender card, added striped decorative paper, added white seam binding on the right hand side and tied a bow on the bottom third before adding my layered sentiment (SU).  The sentiment is a digital image which I printed on white cardstock and trimmed to size before layering onto lavender cardstock which is cut just a bit long on the right hand side.  I trimmed that edge with scalloped decorative scissors and then pierced each scallop with a push pin.
The next two feature focal elements which I created in the process of making birth announcements for my grand daughter last fall.  For the left hand card I layered the laser printed and embossed background onto the front of a lavender card after I had added a length of purple seam binding.  I added the cute little elephant layered element over the seam binding using 3D foam tape and tied a short piece of seam binding with one single knot to the one on the front to simulate a bow.


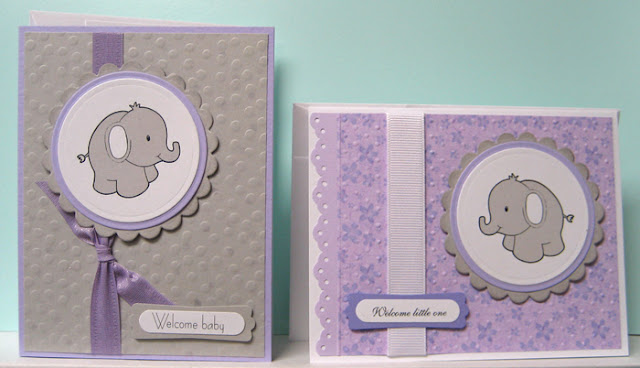
  I layered my laser printed greeting onto a label punchie (SU) and adhered it to the card using 3D foam tape. For the right hand card, I created a background using colour printed background paper in purples on lavender cardstock, punched the one side using an eyelet border punch (SU) and then embossed a line using my score tool which helps add texture and define the edge of the colour printing.  To add still more texture I embossed it with the Swiss Dot embossing folder.  I added a length of white gros grain ribbon to the background before adhering it to my white card front. I layered my laser printed greeting punchie to a purple label punchie (SU) and adhered it over the ribbon with 3D foam tape after I added my little elephant focal element to the right hand side.   Was fun to work with different colours and supplies!!  Therese

Thursday, December 01, 2016

Maple leaf birthdaycard

This card features a laser printed graphic maple leaf image which I watercoloured and layered onto a rectangle of embossed yellow cardstock which I border punched (SU) and pierced before adding red gros grain ribbon below the image and tying a short piece to it to simulate a bow.  The background is embossed black cardstock to which I added a length of wide white gros grain ribbon gluing the ends to the back before layering onto a red card front.  The greeting is laser printed and glued to the right hand of the card.  Love this colour combination!!

Therese