Thursday, January 31, 2008

My Art - House Blessing

This project is a year old.
I made several of these for my children last year for Christmas. I was short of the white and gold serendipity collage so mine has been sitting on my desk since last year. Tonight I decided to finish it. The white and gold serendipity was quick and easy. The frame was purchased at $1 store and painted white. I trimmed the white and gold serendipity to fit in the back of the frame and used 3D foam tape to attach the heart leaving it curved a little to create a little pocket for my blessing.
It will sit by the front door to bless all those who come and go from our house!!

It is nice to have a piece of my art on display in my house. I hope there will be more pieces that will show up over the course of the year!!

Therese

My Art - 31 hearts for January

Art everyday!!

Here is my collection of 31 hearts for January!! I have to admit that I did not make one every day. It was more more a case of making a few once a week or so. It has been fun and I hope to find a project to incorporate them in. I have created quite a few more this month which have already been included in several of my projects.

I am tempted to hoard them - they are all kind of cool and seem to be the begin of a collection!! I expect it will be wiser to let them go when they need to!!

Therese

Thursday, January 24, 2008

My Art - Valentine's card

A Valentine's card for my special guy!! Used more pieces from that heart sticker pack I used earlier this week to create this one!! The tag in the vellum envelope features one of the round sticker tags which I layered onto a white one which is stamped on the bottom with a phrase from SU. This set was a hostess set last catalog and I managed to snag it at the open house my SU demo had on the weekend!! I am getting to a place where I need more time not more stamps!!! The sidebar is also a sticker. I stamped the background with the collage love stamp from my latest SeeD set!!

The vellum envelope is created from a square of vellum and sealed with a punchie!! Very quick and easy way to make an envelope - just fold three points to the middle - and they can be created any size!! I like to use this one on cards because of how quick and easy it is!!

Make sure you take some time to let that special person know how much you love and appreciate them!!

Therese

My Art - Journal tip ins

Created this layout with the theme of vintage children for the journal group. It was totally fun to do!! I used my Sizzix Alphablock dies to cut out the header letters. Added a strip of white scalloped cardstock between the "bulletin board" and the header. I use my scallop scissors and then a push pin to poke holes in each scallop to create a lace effect. Try using thick fun foam or a foamy mouse pad under your cardstock to get even holes. I created the diamond pattern with cardstock strips over the scrapbook paper. I glued the edges and used thread and white pearl seed beads on the inner junctions so it would be like a real bulletin board and the images could be just tucked in. The images are laser printed to which I have added, in Dymo font, a characteristic of children - wise, loyal, curious, etc. This is for February and I am way ahead of the game!! So new for me!!

Therese

Wednesday, January 23, 2008

My Art - guy cards

A couple more guy cards. On the first I layered a watercoloured
baseball image onto a piece of "caught in a crystal" background paper!! Added a bit of a ribbon and a tag. I used the horizontal slot punch (SU) to cut a very slight slot on the spine so I could pass my ribbon through. I like to use a punch to make a slot or hole on the spine for ribbon or fiber because it cuts so cleanly.

To do this just hold your punch upside down so you can see the paper through the punch hole. Line up the spine edge so the punch just barely catches the edge. Will nicely cut a slot for your ribbon. If needing a hole for fiber I usually use a round hole punch the appropriate size. Again, hold the punch upside down so you can see how much of the spine you are punching. Usually, about 1/4-1/2 of the hole is sufficient for passing your fibers through.

On the second I used several elements and combined them in an interesting layout. I added some track in front of the train with a black marker, watercoloured the image and then cut out. The lake scene I watercoloured, trimmed and layered onto black. I layered the black colour printed greeting on black and then created an interactive layout with them. It was fun to play and rearrange until it "worked"!! Just glued all the elements to a testured white card.

Try using your images in a way you have not done before. Cutting them out, stamping in a different colour, using only part of a image, etc. It makes for more versatility with the stamps you already have and a different look to your layouts. It is good to step outside the box - our own or someone else's - to see what is possible. If something really doesn't work out put them in your serendipity or collage box for addition to some later work of art!!

Therese

My Art - Guy cards


Guy cards can be a challenge for some so I am sharing the few I made this afternoon. I happened upon this wonderful gift wrap a while back and thought the colours were great and it would be good for guy cards, driving & auto projects or layouts. I have used the paper as a background and featured old automobiles. These stamped images were received several years ago in a "male images" swap and it has been great to use them for cards!! I watercoloured the images and then cut them out to layer them. To the first I added sticker letters for "birthday" and stamped "happy" with rubber. On the second one I handwrote the greeting in black beneath the car. On the third I used a small greeting (SU) and stamped directly on the image.

I have missed watercolouring in the last few months. I have used other techniques but I still really like the look of watercoloured images.

Therese

Monday, January 21, 2008

My Art - T&T Fat Book Mingle page

Created this fat book page for the This & That Fat book page mingle. I chose do a page on Valentine's this time around. The background paper I used is actually gift wrap which started out being ivory with tan writing. I colour washed it with acrylic paint to better suit my colour scheme. Worked out very well!! It is always better to colour wash your paper before you cut it to size because sometimes the paper shrinks a little. The top of the image is the back and the bottom is the front. I created a shaker to add to my page using acetate and a frame from the same sticker sheet I used for my coaster calendar. I had hoped the words underneath would be more legible - just a few too many red and gold confettis in it!! The words are repeated on the back so that works. I added some paper lace from a doily, some ribbon, a bit of the border sticker and some handwritten love quotes. I am a bit early with this one - not my usual MO - but I have classes to teach in February which will be taking a lot of my time so I am planning ahead with some of my other projects.

Therese

My Art - Valentine's Mingle

This Valentine's mingle has been going on for a few years and it is always fun to participate!! I decided to step it up a notch for myself this year and created a double coaster calendar!! It was so fun to make!! I covered both sides of my chipboard coasters with my own hand decorated paper. The inside piece had to be colour washed a bit with yellow to bring it up to the same warmth as the stickers I wanted to use. No problem - worked very well. The strips are stickers from a $1 store pack. I created a little acetate pocket for my calendar pages (printed using PrintMaster). It can be filled with another small calendar for the next year or a photo, postage stamps, or whatever!! I attached it with double sided tape. Added ribbon on both coasters for accent and interest. Added a gold embossed heart on the left hand side along with "CREATE"!!
Created a little binding with gold thread so the coasters would stand and not be wobbly with each other. Added gold hearts to the outsides to cover the holes I punched for the ribbon. The front also has an interesting angel transparency on the front. A totally fun project and will make a great addition to someone's studio!!

Therese

My Art - Journal Tip ins

I am part of a new group that was spawned off of one of my regular groups to experiment with altered journals. The eight of us have each chosen a theme and indicated the size of pages we need to tip into our journals. Here is the spread I created for Bettiann's journal whose theme is nature and quotes. I started with light weight cardstock and glued in place two pieces of scrapbook paper which I colour washed with umber to tone them down a bit. I added butterfly borders from a sticker pack. Added a strip of flourishes on transparency and attached it with eyelets in the center of flower punchies. A few of the flowers "burst" with the application of the hammer to the eyelets. They have a more organic look. Real pressed flowers - a pansy and a yellow daisy. A few more stickers, a colour printed quote and some quotes written in by hand. Added a cinquain I wrote several years ago for an exchnage which worked well with the theme. I attached it with corner stickers and leaf eyelets in the top corners to create a pocket. Inside the pocket I added a tag with my info and a photo. I was careful not to add too much bulk to the spine area. Very happy with the way this layout turned out!! We will all have wonderful journals by the end of the year.
I would certainly encourage you to modify any preprinted paper to suit your needs. Amazingly, a very light colour wash can bring a paper that is just "off" in colour right up to where you need it to be. I also use my stipple brush and inkpads to modify the colour of items which are not quite what I need them to be. Works really great with silk flowers!!

Therese

Thursday, January 17, 2008

My Art - January Cardmaking

Just a little card!! Has a pocket to slip things into - a gift card, cash, some coupons, love notes, a poem or even a little bling for someone special!! I included a card inside for a greeting or message. This card is 4.25" x 4.25" and is created using a 4.25" x 11" piece of cardstock. Score and fold at 4.25" and 8.5". The last little piece is folded up and creates the pocket!! I used 1/4" double sided tape on the sides of the pocket to keep it in place.

Have a wonderful day and be a little creative!!


Therese

Mixed Media Market http://groups.yahoo.com/group/mixedmediamarket/

My Art - January Cardmaking

These square cards can be made into frames by the recipents!! Adds a little fun to recieving a card from a friend!! The card front has a hole cut into it which in this case is in the middle and is also a square. I cut this one by hand but it certainly could be cut with a die instead. There are LOTS of other possibilities!! I simply attach the greeting (colour printed) to the inside front of the card with invisible tape so it can easily be removed. It is then just a matter of removing the insert and applying some glue to the right hand and bottom inside of the card and folding over the front to create a pocket in which a picture can be added. For display, add a magnet to the back, a ribbon hanger or feature on an easel.

A gift in a card and a little project for your friends to be creative with!! Great as a baby card to display the latest picture and to finally be added to a scrapbook.

Therese

My Art - January Cardmaking

This card features a piece of seed paper which I made myself. I incorporated seeds into a small sheet of handmade paper!! I used a wildflower seed mix available from T&T seeds but if you are wanting to make your own any seeds that are not too bulky can be used. I wanted the seed paper to be easily removeable so I created a tab in the lower right hand corner to tuck it into and then added a flower accent put on with a brad. I included instructions for planting the seed paper so everyone could include them with the card. It is a really fun way to "send flowers by mail"!!!
I created the tab using my SU slot punch. First I used my corner rounder on the corner of the card then put the slot punch over the corner and punched it equidistant from each side. Worked very nicely!! I had tried using the slot punch without first using the corner rounder and it did not punch quite far enough for the seed paper sheet to be centered on the card front. When assembling the flower accent it was best to glue all the elements to each other before putting in the large brad. It is frustrating to have all the elements lined up and have them move in the process of adding the brad. Another card that gives a little more and just the thing for spring birthdays for the gardeners on your list.

Speaking of lists - if you want to stay ahead of the cards you need for family and friends a birthday calendar is the perfect thing. It has a page for each month and a list of each day. You simply add the names and occassion by each day as appropriate. For example on February 14 - Valentine's Day card for DH. It stays the same year after year and you can keep adding to it as the years go by. If you add the year as well, you can also stay aware of the special occasions like a fortieth birthday or a fiftieth anniversary. My birthday calendar is actually a word processing document which I print up at the beginning of the year that lists months and day along with the names and occasions and dates if I know them. As the year goes by I highlight the names as I send the cards and add, by hand, the new ones I want to add. At a moment's notice I can see the cards I will be needing in the next month. At the end of the year I update my electronic file with the additions and print off a new one for the new year. In the end, it is important to use the tools that work best for you. I find it helpful when others share how they manage their lives because it sometimes provides inspiration for me to update or complete revamp what I am doing. It is good to have a process for managing what is important in your life.

My Art - January Cardmaking

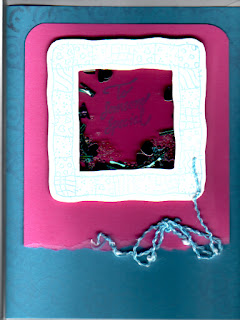
Have always wanted to teach a shaker card to my cardmaking group but the challenge was always how to create the shakers in class - sticky tape, beads and confetti - had potential for not going so well!! Yesterday, I decided to create shakers ahead of time which made the whole process so easy!! Here is how I created the shakers:

- Stamped the frame image on a piece of paper
- Laid over a piece of acetate - over head transparency cut to size
- Taped the corners to keep it in place
- Added double sided foam tape so it would be hidden by the frame
making sure that there were NO gaps where items could escape
- Added about 1/2 teaspoon of "shaker" - glass beads & confetti - how much depends on the thickness of your foam tape - double up if you need more space
- Removed the protective paper from the foam tape
- Placed another piece of acetate over top
- Press to seal nicely

These worked so well. We used double sided tape to attach the trimmed frame to the trimmed shaker and then to attach it to the next layer. I stamped a greeting on this layer so it would be visible through the shaker!! So cool and I think a little shaker action makes a card really fun for kids of all ages!! So give shaker cards a try!! They do add a little pizzazz to your cardmaking. Consider interesting "shaker" items - seed beads, glass beads, confetti, punched shapes, seeds, grains, sequins, etc. Make them large or small. Change up your frame to suit the recipient and the occasion - a bag, a box, a gift, a heart, a snow globe, etc.
Therese

My Art - January Cardmaking

My January Cardmaking session was last night!! Had a good crowd and we had fun making cards!!
I wanted to present cards that give a little more than the usual. This one features a heart magnet!! I removed the covering from several "advertising" sheet magnets I have collected over the years and glued paper over them. I used my Cuttlebug heart dies - the largest in the set of four - to cut out the magnets using my little SideKick. Could have used my Cuttlebug but the available space on my desk was VERY limited so the SideKick fit much better. I hot glued a 5/8" metal disk - bought at a thrift store years ago - to the cardstock and added the magnet. You could use any ferrous metal - tin can or flashing to do the same. Just cut a small square with tin snips. The other hearts I cut out of decorative paper - mostly papers that I have decorated myself. The green ones are polished stone and the bottom ones are from a page from a travel magazine. The photo was of a woman in a cave and featured some very wonderful yellows, reds and browns!! I glued the page to cardstock and then cut out the hearts!! Made very "arty" looking hearts for my cards!! Just what I wanted.
Whoever receives this card will be able to put the little heart on the fridge and be reminded of you often!! Just a little some extra!!
Therese

My Art - Card exchange

Made this little card for my Card Club card exchange the other night. I was thick into my prep for my cardmaking session and was inspired by one of my designs to create this one. The white on the front is clear cellophane printed with white. The cello is covered with a collage of images included hearts, flowers and script!! Bought the roll for a $1 at Dollarama last fall sometime. It has so much potential for collages and other pieces. I freehand cut this image from the sheet along with a few others. I have layered it onto silver which in the scan looks black. I traced the heart from the front to make an impression on the silver and free hand cut out the heart out of the silver so the red cardstock would show through. I love the transparency of the cello and it worked out just as I had intended. I attached the cello and silver layer to the card with four silver brads. I made a little pocket on the inside and included a few images for playing!!

Could be a quick and easy Valentine's or anninversary card!!

Therese

My Art - Card

Another early January birthday card!! I stamped leaves on the navy stripof cardstock with embossing ink and used several different embossing powders over them - clear, gold, silver and copper!! I stamped one on white, gold embossed & watercoloured it then cut it out to use as an accent over the mutlicolour fiber I tied around the strip. Added a navy greeting on the bottom.
I truly love making cards and most enjoy being creative with my tools and papers!!

I have added a header to my blog. This is digital art I created several years ago for my Christmas letter. It was fun to play in the paint program and see what I could make with the different tools available. I will be changing it up every so often.

Therese

My art - Card

My first card of the year!! I have always tried to get my January cards made and out for the end of December so that those with early January birthdays will receive their cards before their birthdays!! It has always been a challenge to make it happen and this year I was late getting them out though I did manage last year!!
I made this card for my brother who is an artist and handyman. I used a piece of polished stone cardstock and layered it with gold gift wrap onto a black card. Added a slidemount with an architectural building transparency I printed a while back along with some old postage and an interesting punch out with a date on it. I just arranged the elements until I was happy with them and then glued them into place. I added the stamped greeting afterwards. Added a bit of a "signature" on the black card with a gold gel pen.
I have a file where I file anything printed materials that I have leftover after any project. I like going through the file when I am looking for collage elements or that "just something" to finish off a piece or card.
I have one personal resolution this year and that is to listen more! I expect it will enrich my life and hopefully will be a benefit to the others that share my life as well. I have also made one art resolution too - to make art everyday! I am making hearts. At this point I do not know what I will do with the hearts but it is a manageable goal so I will see how it goes. I have managed to make 17 hearts but necessarily one each day but I continue to embrace the spirit of the resolution!!

Therese

Tuesday, January 08, 2008

Giftie Swap

Have been saving this since early fall when I actually made these little ornaments for a giftie swap on one of my lists!! I gold embossed on polished stone cardstock. I made an effort to leave a halo area at the top for the candle on each of the ornaments. I packaged the stamped cardstock into a portrait name tag holder and added a 2007 tag along with a colourful fiber hanger. I hope everyone enjoyed them.

I am so happy with the wonderful gifties I got back in this swap!! Thanks to you all - you know who you are!! - for the wonderful gifts!!

This is my last art of 2007!! Very happy with how well blogging has gone this year and am looking forward to 2008 and adding some features to my blog!!

Therese

Thank you cards


Have some of this wonderful paper sitting on my desk from my last class so incorporated it into a few cards!!

I added a silver snowflake to the second one!! I used the Martha Stewart punch snowflake punch. I see that she must have two designs out because my daughter sent wonderful gingersnap cookies with our Christmas parcel and had snowflakes punched out of the packaging and it is a different design. I will have to do some swapping with her for my Christmas cards for next year!!
Therese

Thank you cards

Another very different look with the same decorative paper!! I bought the SU baroque motif before Christmas and have been itching to use it!! Worked quite nicely with the paper in this layout!!

Therese

Thank you cards

A totally different look with the same decorative paper!!

Therese

Thank you cards

Another card made with the second generation from the POD technique!! The white greeting was stamped in white pigment ink and then embossed with white embossing powder. Love that wrought iron corner punch!!

Therese

Thank you cards

I like the use of the three different pieces in this layout! The white lettering and brads stand out nicely!! This is a second generation from the flower POD.

Therese

Thank you cards

This card features the decorative paper I made with the trees stamp as well. It is layered onto yellow and then onto dark green. I used the SU large oval punch to make a hole to reveal the greeting. The greeting is stamped on ivory and it needed a bit of stippling to soften its look and work better in the design. Quick and easy once you have your decorative paper made so make a few sheets when you have your supplies out!!

I made three - the flowers, the trees and the hearts and made up the second generation ones as well so I had a nice little stack to work with for these cards.

Therese

Thank you cards

I used trees - Magenta - to make this paper along with fall colours paints. Happen to find the center medallion in my 'Extra images" envelope and it worked perfectly to tie the desing together. I beleive the medallion design is also Magenta.
I like to make larger pieces when making decorative paper so I can use them in different shapes and sizes!! The greeting is laser printed and then stippled with green to coordinate with this card!

Therese

Thank you cards

More Thank you cards! Similar to layouts I have done in the past. The center portion of this card is the second generation of the "Pressing out the details" I mentioned in the previous posts which I added more stamping and colour to! Makes for three or four levels of colour and intensity in the pieces which I really like. Used a push pin over a small double layer of fun foam to pierce the scallops. I like the sort of eyelet look of that technique. You could use an old mouse pad or some styrofoam under the cardstock instead of the double fun foam. These could easily have been made into Valentine's cards!!

Therese

Thank you cards

I have managed to get all of my Thank you cards made for the blessings we have received over the holiday season!! It is fun to be able to do just any fun thing. I made this "Pressing out the details" paper in preparation for a class I will be teaching in February - more about that later! I was more specific about where I applied my colour to accentuate the resist flowers than I have been in the past when making this resist paper. Olayed with punches as well. The "Thank you" is a new small SeeD set I bought while I was away at Christmas!!
I hope all had a wonderful holiday season and I wish you many blessings over the course of 2008!!

Therese